Running Jupyter Notebooks
Overview
The Jupyter Notebook is a web application that enables you to create and share documents (called "notebooks") that can contain a mix of live code, equations, visualizations, and explanatory text. This is an introduction to using these notebooks on Savio via the Open OnDemand service, which allows you to operate completely via your web browser on your local computer (e.g., your laptop).
Using Jupyter notebooks via the interactive Open OnDemand service
Running a notebook via Open OnDemand
- Connect to https://ood.brc.berkeley.edu
- Just after logging in with your BRC username and one-time password (OTP), the initial OnDemand screen presents a welcome screen. Click the "Interactive Apps" pulldown.
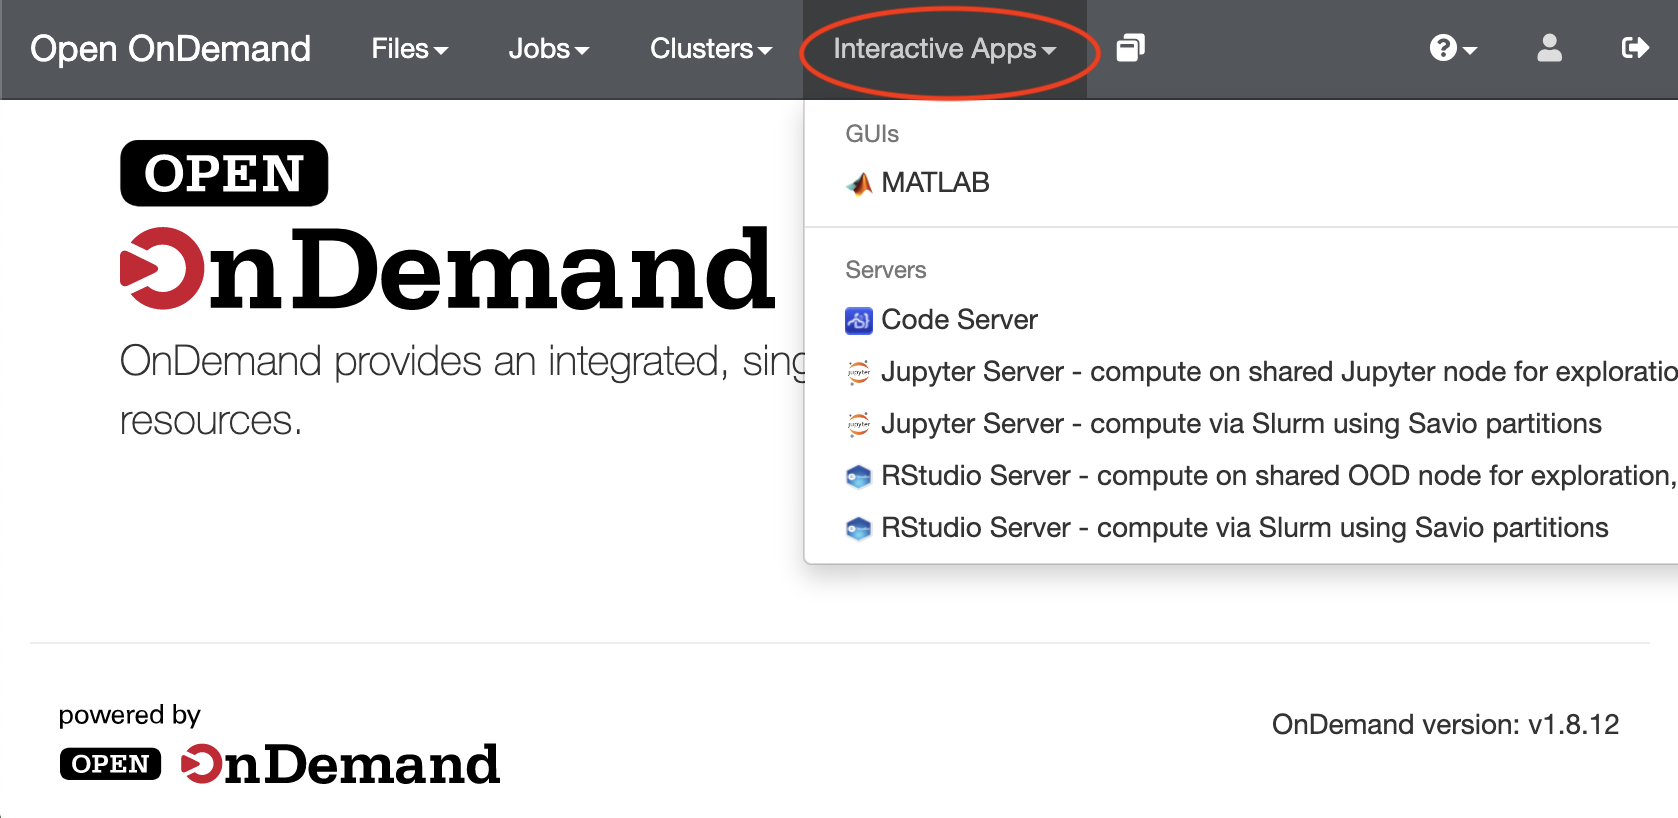
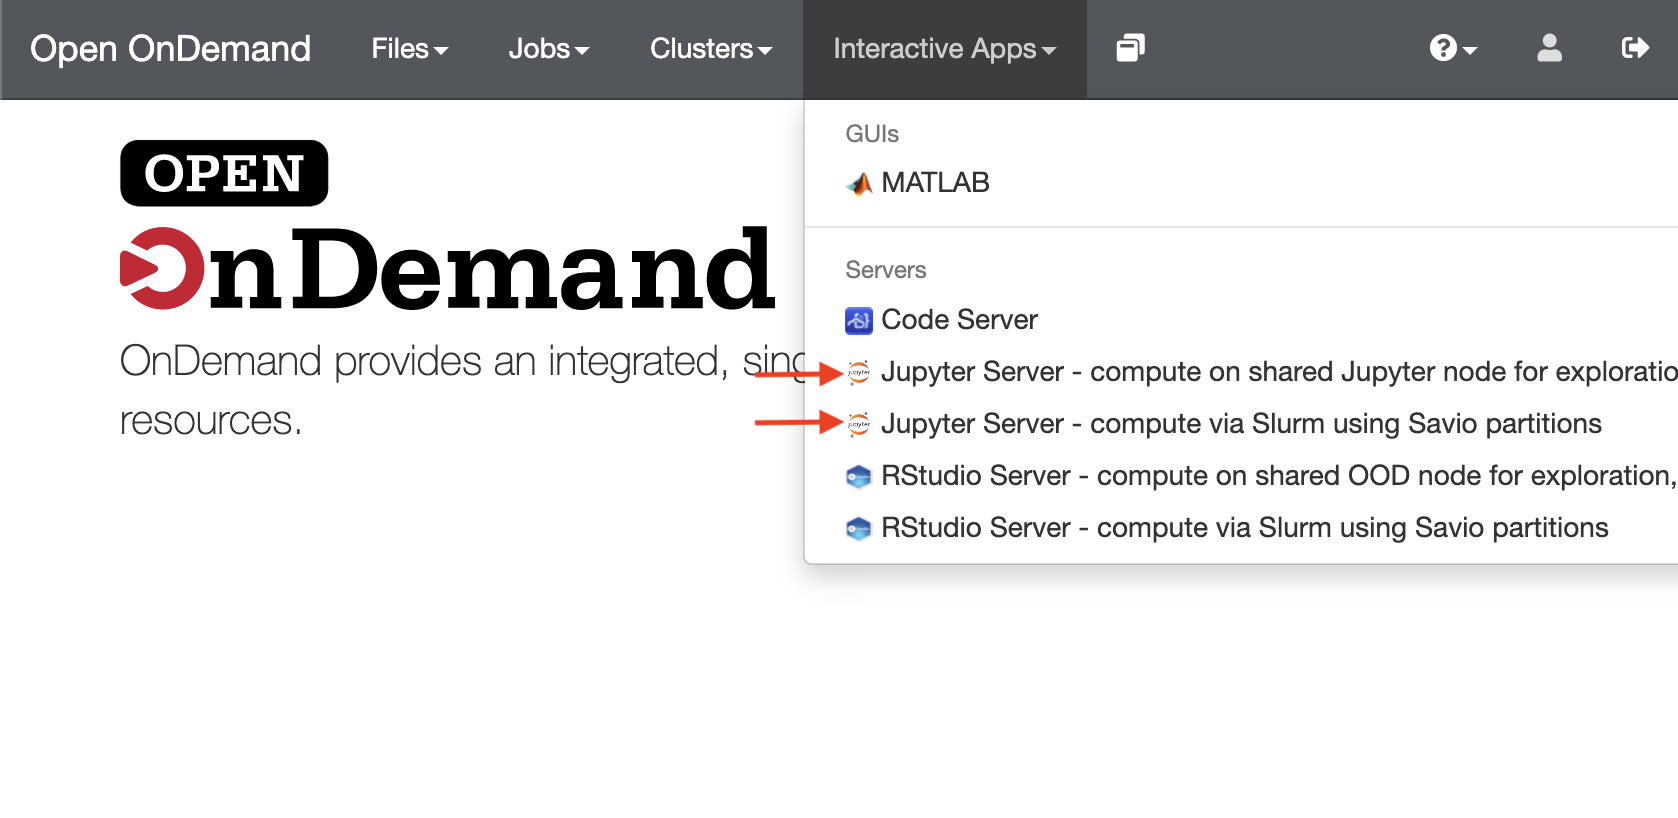
- Choose the appropriate Jupyter Server option to either run as part of a Slurm batch job ("compute via Slurm in Slurm partitions") or on our standalone Open OnDemand server ("compute on shared Jupyter node"). Use of the standalone Open OnDemand server doesn't use any FCA service units or tie up a condo node, but you are limited to 8 GB memory and should only use a few cores, and so should limit use to non-intensive computations.
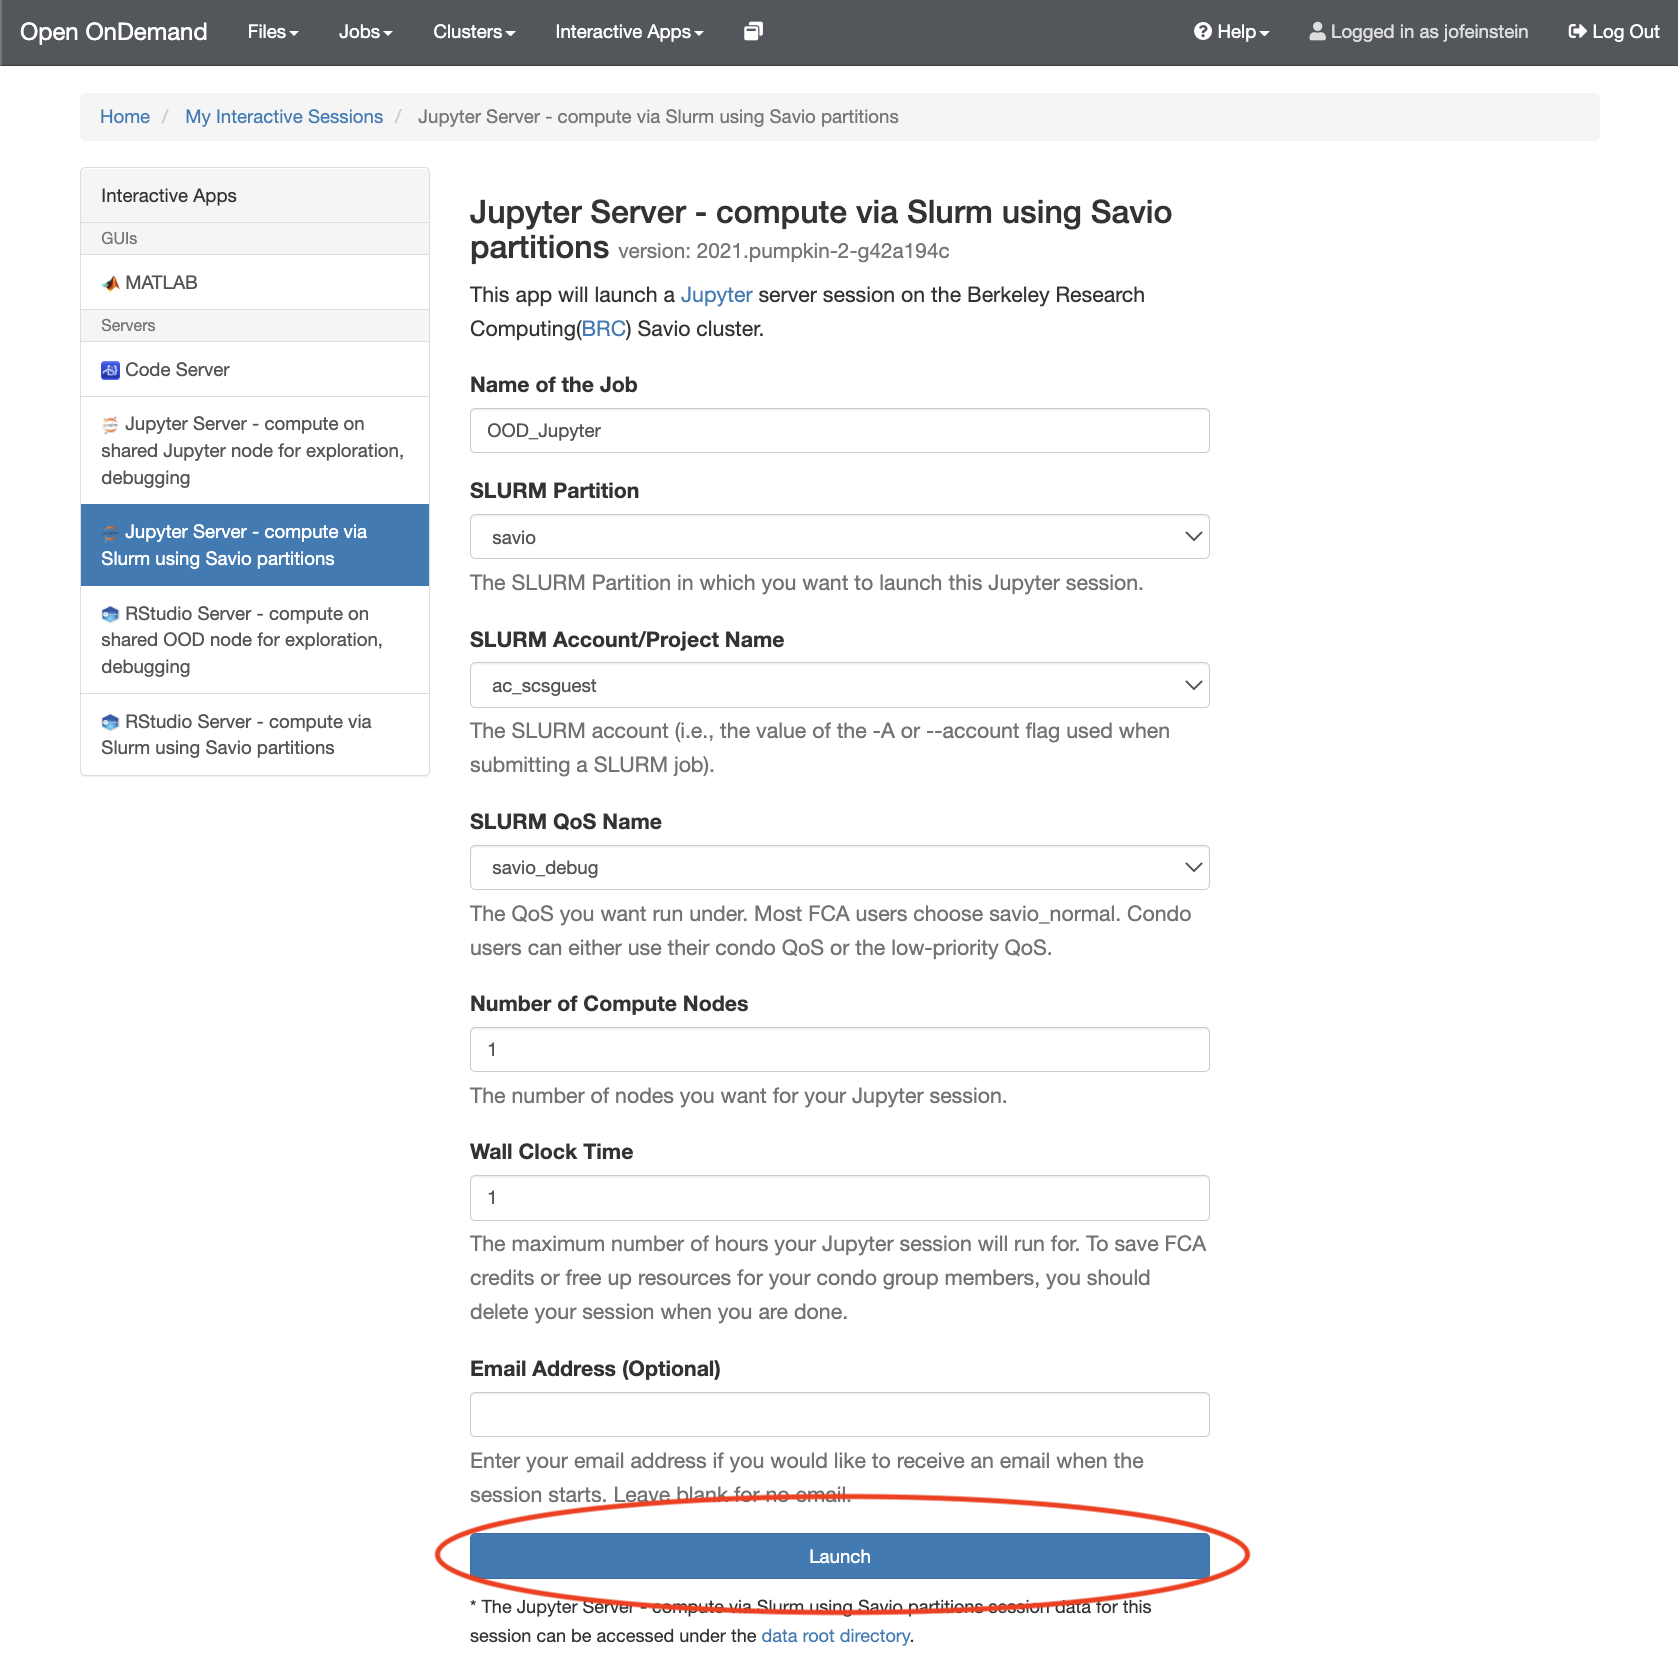
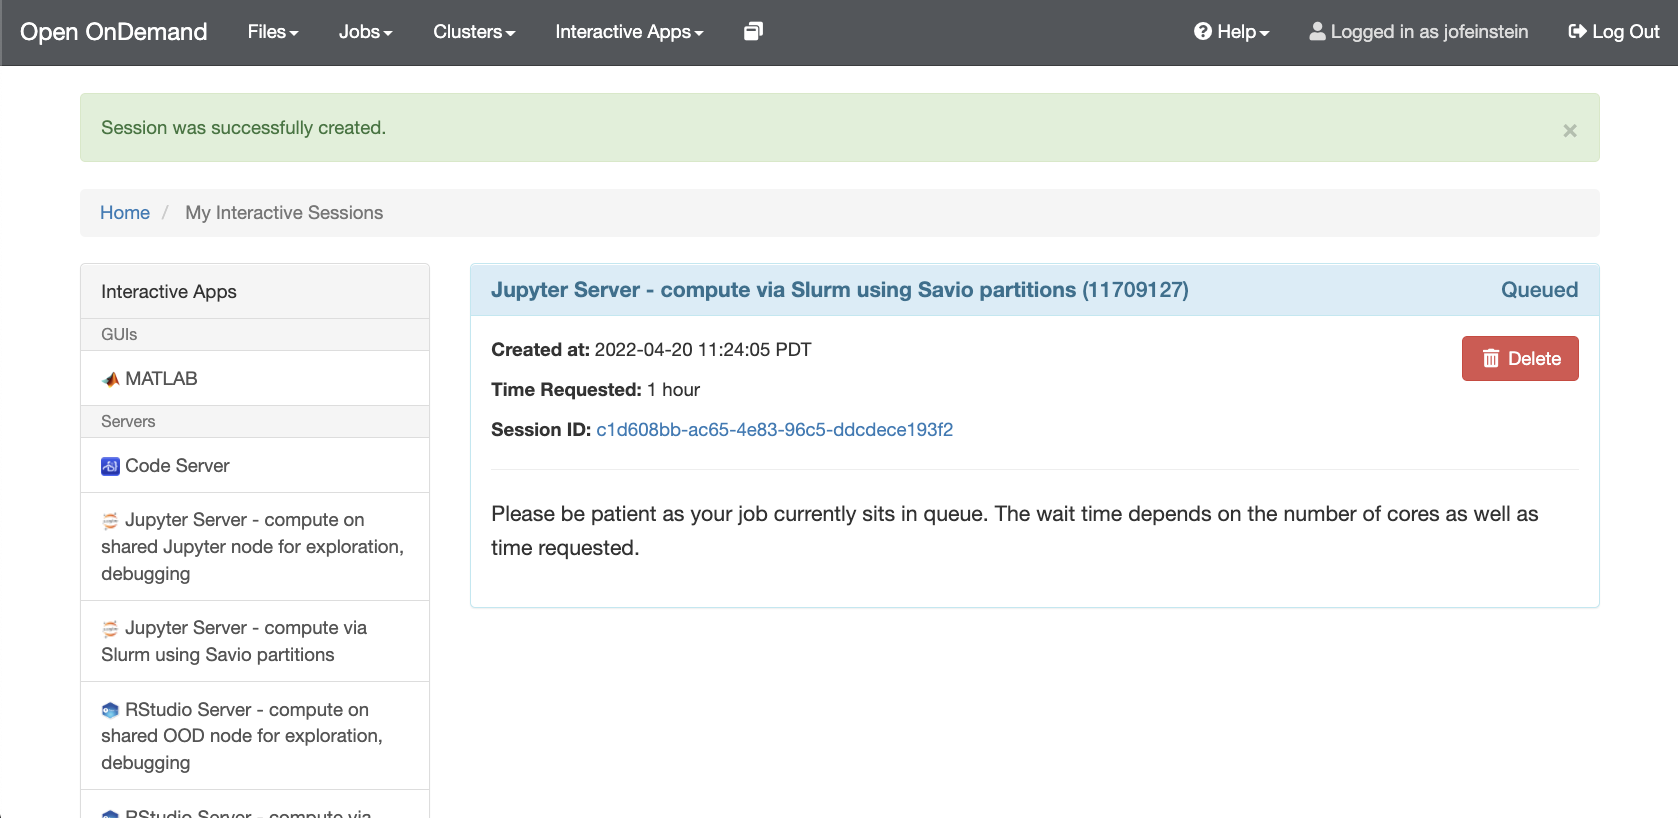
- Fill out the form presented to you and click on "Launch". If any other software modules are needed for your workflow, you will need to requet them at this stage. For Slurm-based work, you'll need to provide the information that you would usually supply when submitting a Slurm job, such as how many cores you need. Once the server is ready, you'll be able to click no the "Connect to Jupyter" button.
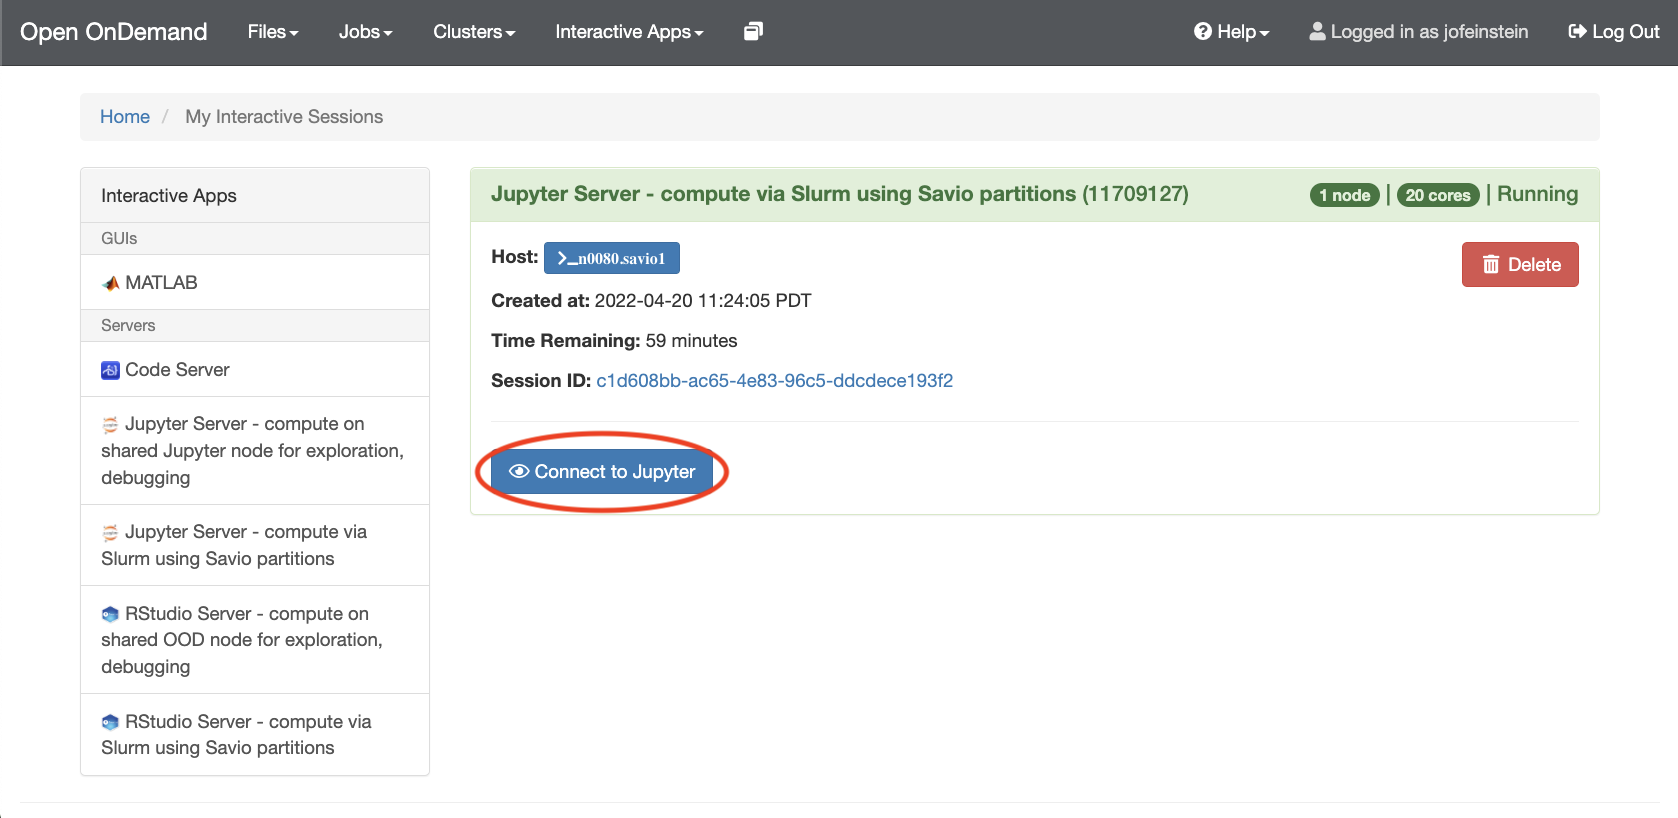
At this point you should already have a fully working Jupyter environment. To start working with Jupyter Notebooks, please see the Jupyter Documentation.
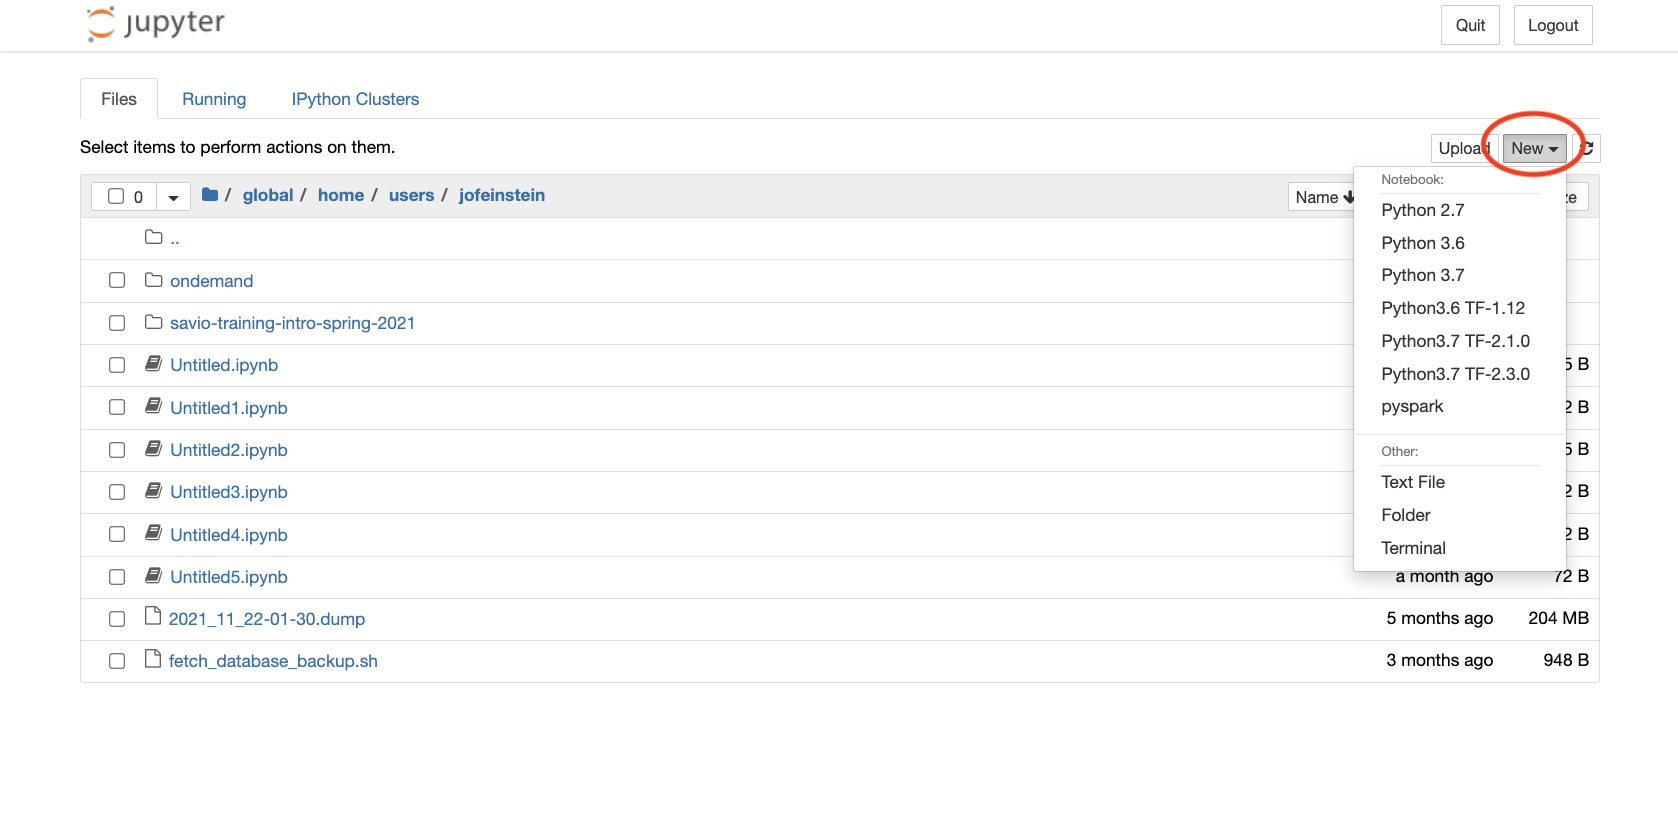
- After clicking on "Connect to Jupyter", the home directory will be displayed. From the "New" dropdown menu (next to 'Upload' near the top right of the screen) select one of the options listed, which include:
- Select "Python 3 (ipykernel)" under "Notebooks" for a Notebook with full access to Python 3.11.7 and the system-installed Python packages in the `anaconda3/2024.02-1-11.4` module.
- Select "torch 2.3.1 py3.11.7" under "Notebooks" for a Notebook with full access to PyTorch 2.3.1 under Python 3.11.7 and the system-installed Python packages in the `ml/pytorch/2.3.1-py3.11.7` module.
- Select "tf 2.15.0 py3.10.0" under "Notebooks" for a Notebook with full access to Tensorflow 2.15.0 under Python 3.10.0 and the system-installed Python packages in the `ml/tensorflow/2.15.0-py3.10.0` module.
- Select “Terminal” to open a UNIX terminal session instead, so that you can work at the command line, rather than in a Notebook. (You might select this option if you need to set up IPython Clusters or add kernels, as described further below.)
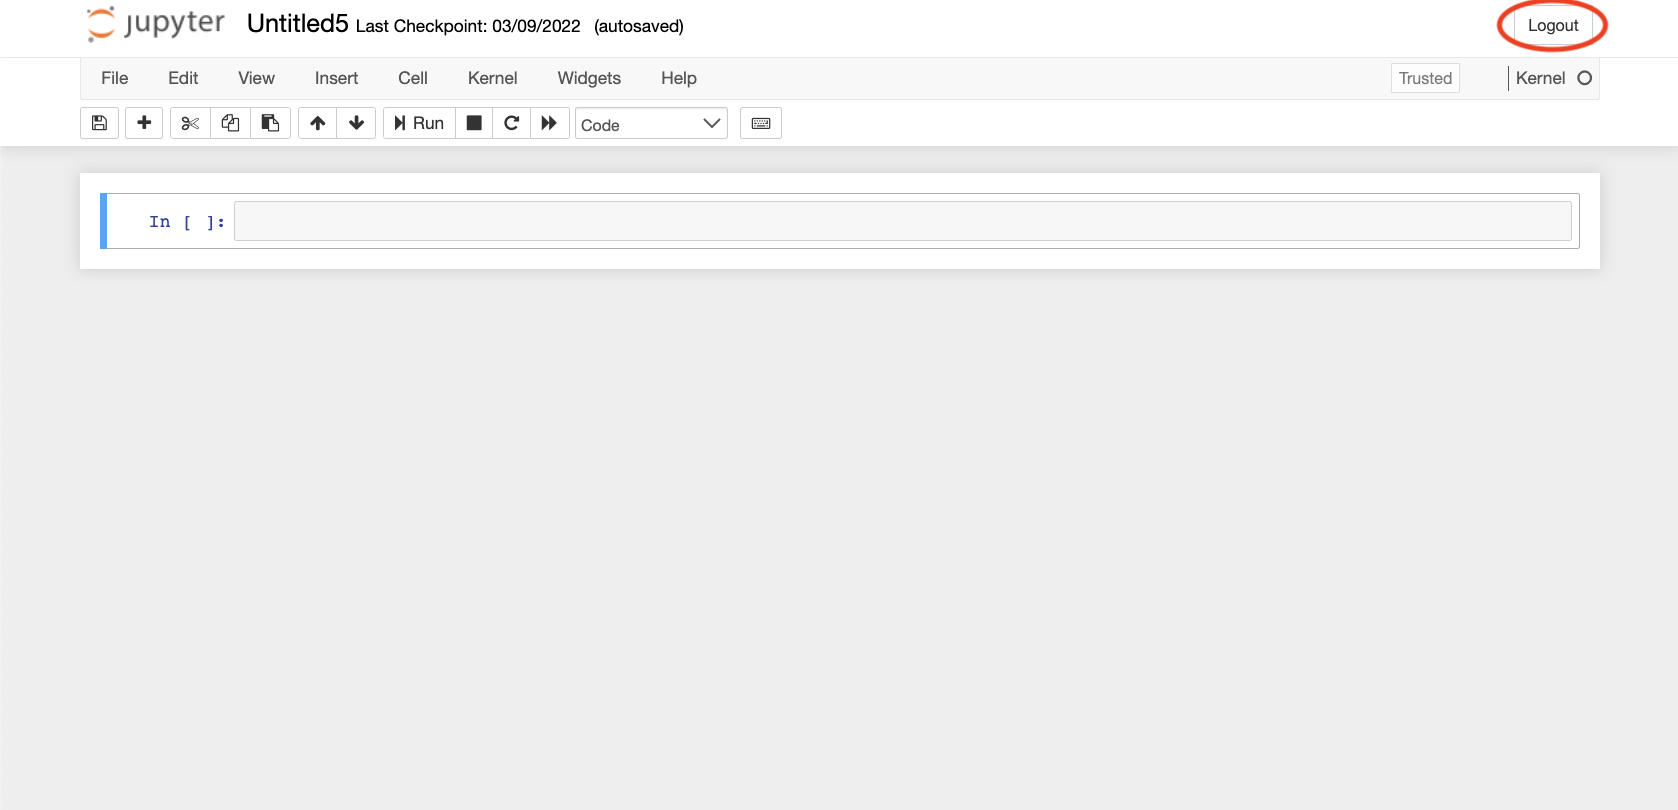
- To move between your Notebook and the control page that allows you to see your files and select any running Notebooks, clusters and terminals, simply click on the ‘jupyter’ banner in the upper left corner of your Notebook. (Or alternately, select “Control Panel” and then click “My Server”.)

- You can have your session continue to operate in the background by selecting the “Logout” button. Note that, when doing so, you will continue to be charged for FCA use or, if using a Condo node, you will prevent others in your group from accessing the relevant resource on which the job is running.
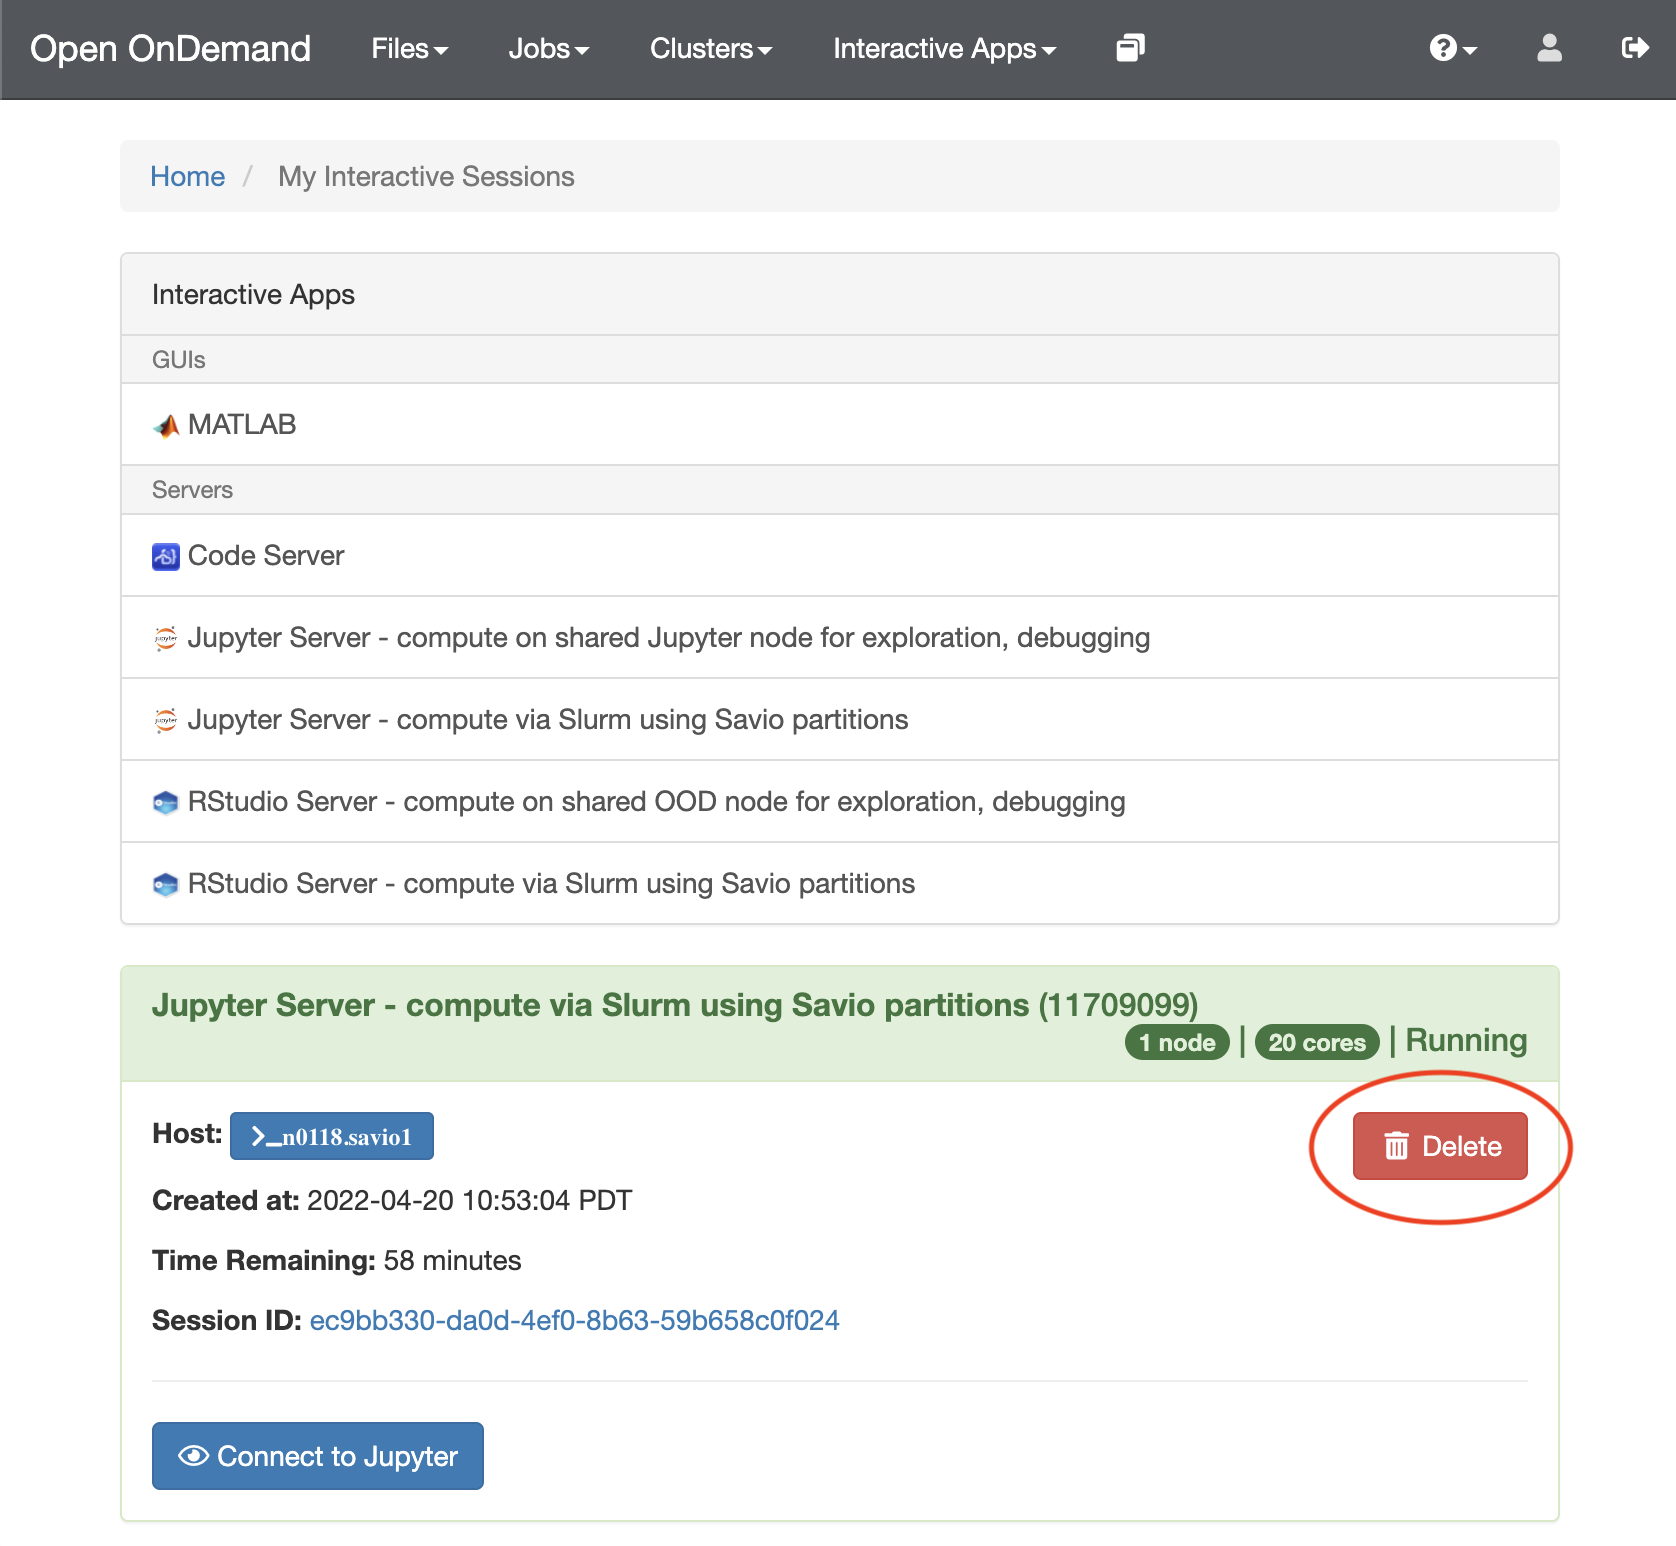
- To terminate a running Notebook, select the “My Interactive Sessions” tab and delete the session.
You can use paralleliztion in your notebooks.
Installing Python packages
A variety of standard Python packages (such as numpy, scipy, matplotlib and pandas) are available automatically. To see what packages are available, open a Terminal notebook (see item 5c above) or open a Terminal on Savio in the usual fashion. Then load the relevant module (from those indicated above) and list the installed packages:
module load anaconda3/2024.02-1-11.4<br>
conda list
There should be no issues using pip to install or upgrade packages and then use them in a Jupyter notebook, but you will need to make sure to install the new versions or additional package in your home or scratch directories because you do not have write permissions to the module directories. You can use pip install --user $MODULENAME to install the module to $HOME/.local. So, if you need to install additional packages, simply load the desired Python module in the usual way and then use pip to install in your home directory. For example, you can install the rpy2 package (needed in the next section) with:
module load anaconda3/2024.02-1-11.4<br>
pip install --user rpy2
If you'd like to install packages with conda install, you'll need to create a Conda environment in which to install packages and then create a kernel associated with your Conda environment as discussed in the next section.
Adding new kernels
Jupyter supports notebooks in dozens of languages, including IPython, R, Julia, etc.If you’d like to use a language not indicated in the drop-down menu discussed above, you’ll need to create your own kernel. You may also need to create your own kernel for a language already supported if you want to customize your environment. For example, to set UNIX environment variables (such as $PYTHONPATH if you have packages installed in non-standard locations) or source a script in advance of running your notebook, you can do this by creating your own kernel. Or if you'd like to work within a Conda environment when using your notebook, you'll also need to create a kernel.
Using a Conda environment
Another approach to adding a new (Python) kernel to your Jupyter environment is to create a conda environment and add it as a kernel to Jupyter. When in Jupyter, you will then be able to select the name from the kernel list, and it will be using the packages you installed. Follow these steps to do this (replacing <ENV_NAME> with the name you want to give your conda environment):
module load anaconda3/2024.02-1-11.4
conda create --name=<ENV_NAME> ipykernel
source activate <ENV_NAME>
python -m ipykernel install --user --name <ENV_NAME>
# Then from here you can do pip install or conda install
As a specific example, here we’ll illustrate how to create your own Python kernel within a Python Jupyter environment, using a specific Python version and specific numpy version. We'll use the conda-forge channel (i.e., repository of packages) as that provides a wide variety of up-to-date, community-supported packages.
module load anaconda3/2024.02-1-11.4
conda create --name=my_numpy -c conda-forge python=3.11 ipykernel
source activate my_numpy
python -m ipykernel install --user --name my_numpy --display-name="Numpy 1.25.3"
conda install -c conda-forge numpy=1.25.1
Now you can choose the kernel you just created from the kernel list in your Jupyter environment, and you can verify that you can utilize and access the specified numpy package from within a cell in a Jupyter notebook as follows:
import numpy
numpy.__version__
Conda environments can take up a lot of space
If you don't need a different version of Python from what the system provides, then using a virtualenv may take less space on disk than a conda environment. Just create the virtualenv, activate it, run pip install ipykernel, and then run the python -m ipykernel install command as above.
Manually creating a new kernel
In some cases you may need to manually create or edit a kernel. One situation is when your notebook needs to make use of software that is available via one of Savio's software modules.
Say we want to create an kernel that uses the ml/tensorflow/2.15.0-py3.10.0 module.
module load ml/tensorflow/2.15.0-py3.10.0
python -m ipykernel install --user --name=tf215 --display-name="Python3.10 TF2.15.0"
This creates ~/.local/share/jupyter/kernels/tf215/kernel.json:
{
 "argv": [
  "/global/software/rocky-8.x86_64/manual/modules/apps/ml/tensorflow/2.15.0/bin/python",
  "-m",
  "ipykernel_launcher",
  "-f",
  "{connection_file}"
 ],
 "display_name": "Python3.10 TF-2.15.0",
 "language": "python"
}
"env" with environment variables to set when starting up the kernel.
To know what to add in this case, take a look at your environment variables after you run module load ml/tensorflow/2.15.0-py3.10.0:
echo $PATH
echo $LD_LIBRARY_PATH
The final kernel.json will look like this:
{
    "argv": [
        "/global/software/rocky-8.x86_64/manual/modules/apps/ml/tensorflow/2.15.0/bin/python",
        "-m",
        "ipykernel_launcher",
        "-f",
        "{connection_file}"
    ],
    "display_name": "Python3.10 TF-2.15.0",
    "language": "python",
    "env": {
        "PATH": "/global/software/rocky-8.x86_64/manual/modules/apps/ml/tensorflow/2.15.0/bin:/global/software/rocky-8.x86_64/gcc/linux-rocky8-x86_64/gcc-11.4.0/cuda-12.2.1-c2hl2dx3hxmrylvdof6mjus4rfjq3d5i/bin:/global/software/rocky-8.x86_64/manual/modules/langs/anaconda3/2024.02-1/bin:/global/software/rocky-8.x86_64/gcc/linux-rocky8-x86_64/gcc-8.5.0/gcc-11.4.0-nfcdl6bpyabpnhhasfzu6y4ge4kfskvl/bin:/global/software/rocky-8.x86_64/manual/modules/langs/anaconda3/2024.02-1/condabin:/usr/share/Modules/bin:/usr/local/bin:/usr/bin:/usr/local/sbin:/usr/sbin:/global/home/groups/allhands/bin",
        "LD_LIBRARY_PATH": "/global/software/rocky-8.x86_64/manual/modules/cuda/12.2.1/cudnn/8.9.0/lib:/global/software/rocky-8.x86_64/gcc/linux-rocky8-x86_64/gcc-11.4.0/cuda-12.2.1-c2hl2dx3hxmrylvdof6mjus4rfjq3d5i/lib64:/global/software/rocky-8.x86_64/gcc/linux-rocky8-x86_64/gcc-8.5.0/imagemagick-7.1.1-11-3ft4tz4j3d2rmf6gl6op2ijqff7hdnmi/lib"
    }
}
Please review the IPython kernel specification for more details regarding the format and contents of this configuration file. In particular, please make sure $PATH, $LD_LIBRARY_PATH, $PYTHONPATH, and all other environment variables that you use in the kernel are properly populated with the correct values.
Enabling extensions
If you want to create or use notebooks with interactive widgets, a table of contents, or collapsible code blocks, you need to enable [Nbextensions])(https://jupyter-contrib-nbextensions.readthedocs.io/en/stable/). From the “New” dropdown menu (same as in step 4), select “Terminal”. Copy and paste the code below into the terminal prompt, and hit enter.
module load python
pip install jupyter_contrib_nbextensions --user
jupyter contrib nbextension install --user
Parallelization in notebooks with ipyparallel
This document shows how to use the ipyparallel package to run code in parallel within a Jupyter Python notebook.
First, start a Jupyter server via Open OnDemand using the "Jupyter Server - compute via Slurm using Savio partitions" app. (You shouldn't use the standalone Open OnDemand server as that only provides a single compute core.)
To run code in parallel across cores on one node, you can start up with workers and run your parallel code all within your notebook, as described here.
If you'd like to run workers in parallel across multiple nodes, this may be possible and feel free to contact us to discuss further. Alternatively, you might run your code non-interactively outside of a notebook, as discussed here.
Former Usage of IPython Clusters
In the past, we guided users to make use of IPython Clusters to allow one to use parallelization in a Jupyter Python notebook. We no longer recommend this approach, and in fact, use of the "IPython Clusters" tab no longer works in notebooks run via Open OnDemand on Savio.